Cloudflare R2是什么
Cloudflare R2 是对象存储,完美兼容亚马逊S3。相较于传统的云储存服务,比如微软的OneDrive,谷歌的Google Drive,Cloudflare R2有着更多的使用场景。比如,如果我们需要建一个简单的静态网站,我们甚至都不需要服务器,我们可以直接将网站数据放到对象存储的容器里,访客可以直接调用容器中的数据来访问网页。
为什么将WordPress备份到Cloudflare R2
通常我们会将WordPress将网站数据备份到服务器,但是假设服务器出现了问题,比如说被黑被入侵,失去服务器权限,那么网站的备份就麻烦了。
所以,最好是多手准备。将网站数据保存一份到服务器端,再保存一份到其他存储端,比如微软OneDrive,Google Drive,亚马逊S3,Cloudflare R2。
Cloudflare R2作为对象存储,优势很多。比如,提供了每月10GB的免费空间,这相比于老大哥亚马逊S3要优惠多了。而且作为Cloudflare公司推出的一项服务,大公司,稳定可靠,是值得托付的。
| 永远免费 | 月度费用 | |
| 存储 | 10 GB/月 | 0.015 美元/GB 存储 |
| A 类操作:改变状态 | 100 万次/月 | 4.50 美元/百万次 |
| B 类操作:读取现有状态 | 1000 万次/月 | 0.36 美元/百万次 |
“每月多少GB容量”,对象存储服务通常采用这种容量计算方式,这和常规云储存是不一样的。不懂也没关系,总之一般的网站是不太可能超出免费限制的。
如何将WordPress备份到Cloudflare R2
通过插件实现方案
Duplicator
Duplicator在付费版Duplicator Pro中提供了一键备份WordPress到Cloudflare R2的功能。我使用了很长一段时间,非常稳定。
下面介绍具体使用方法
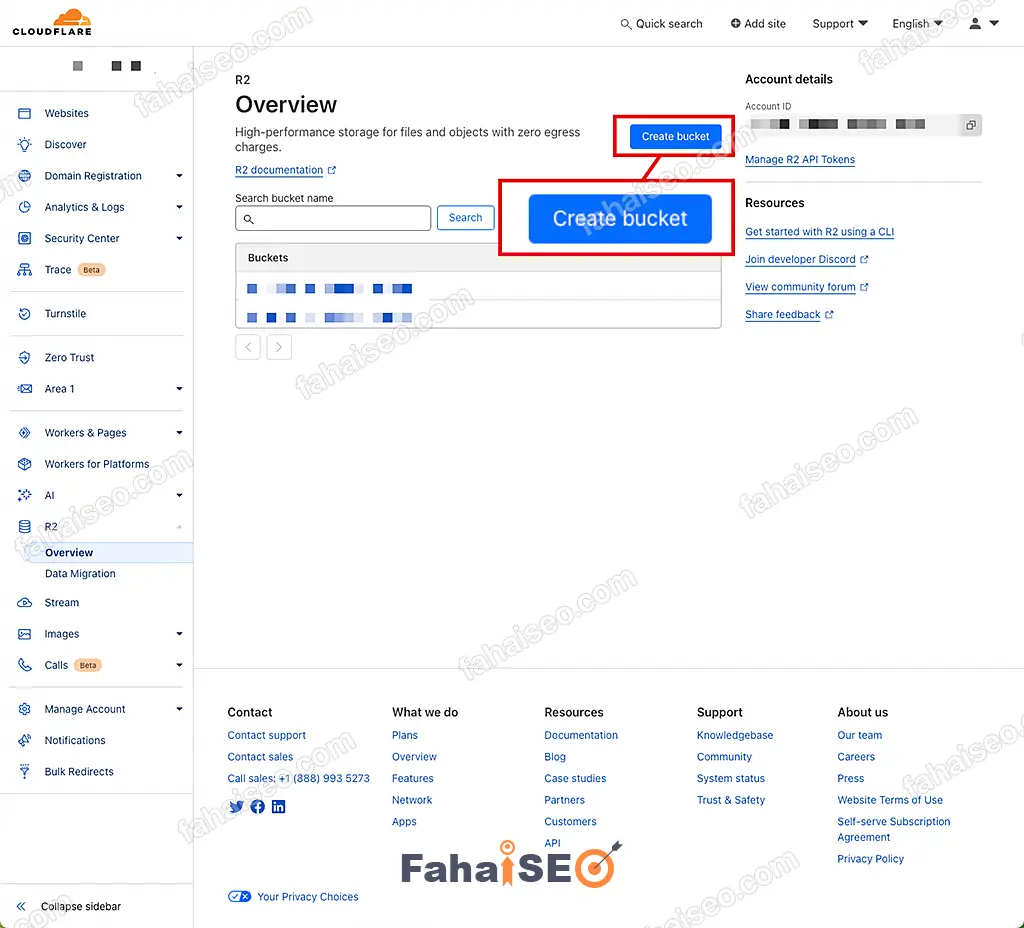
登陆Cloudflare后台,在左侧边栏找到R2功能区,点击Create bucket新建容器。
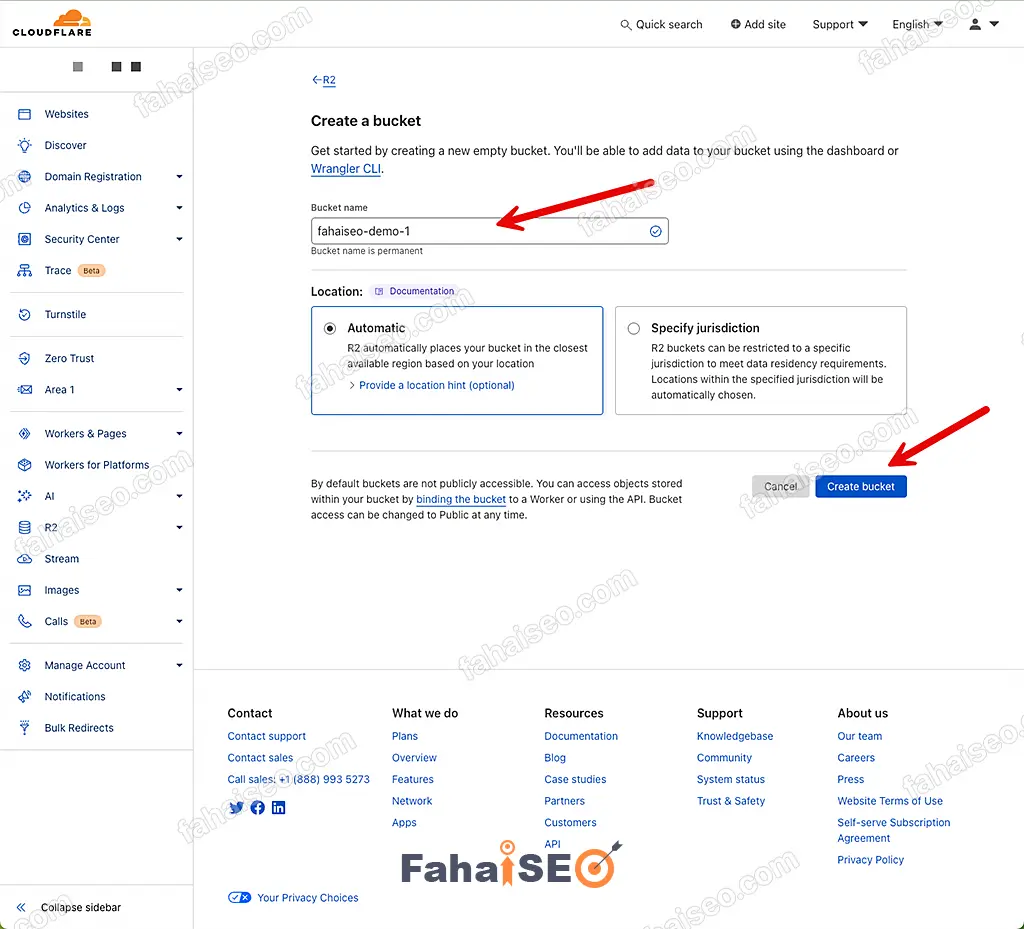
给容器取个名字,完成容器创建。
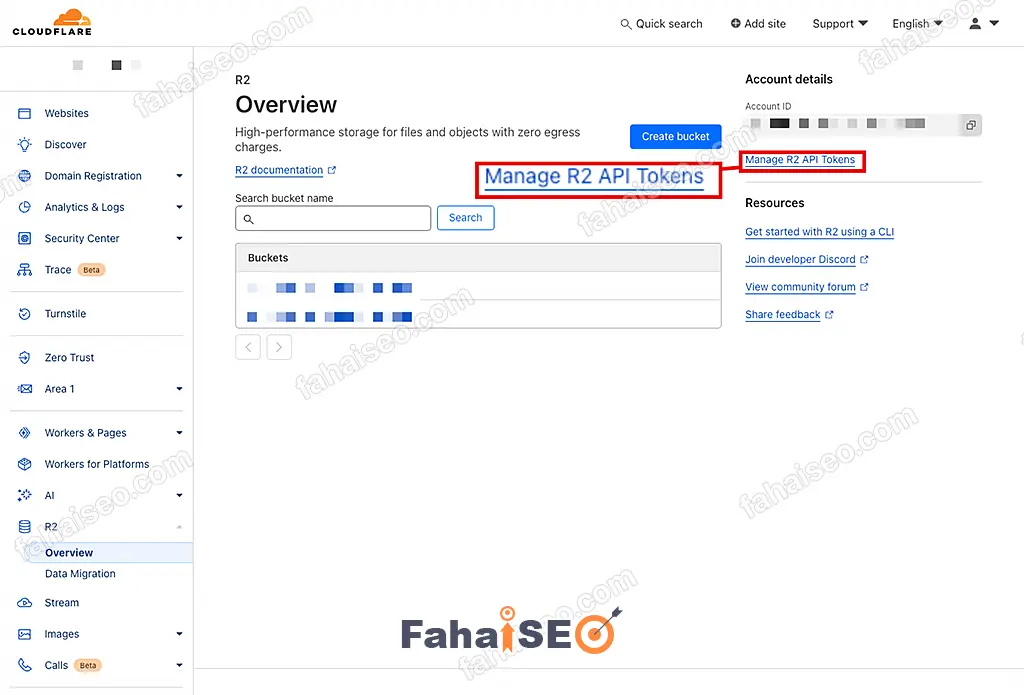
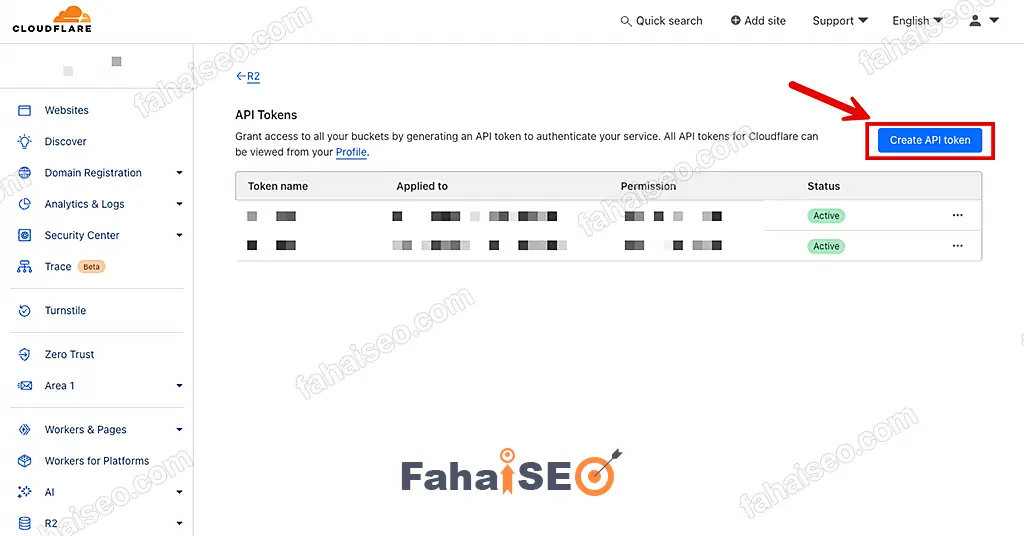
回到Cloudflare R2主界面,选择Manage R2 API Tokens,创建R2 Token。
点击Create API token,创建Token。
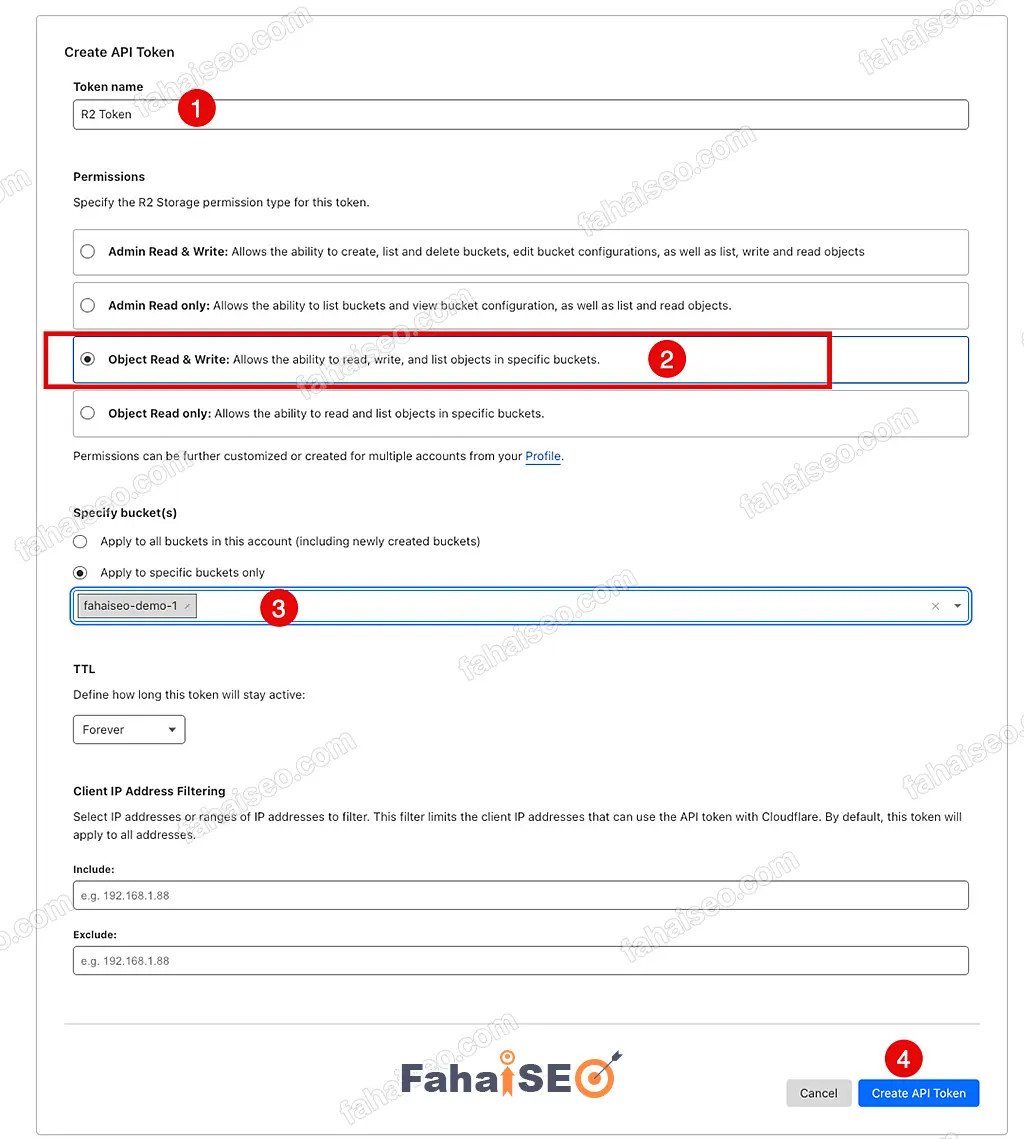
Token name随便取,Permissions选择Object Read & Write,Specify bucket(s)选择刚刚创建的容器
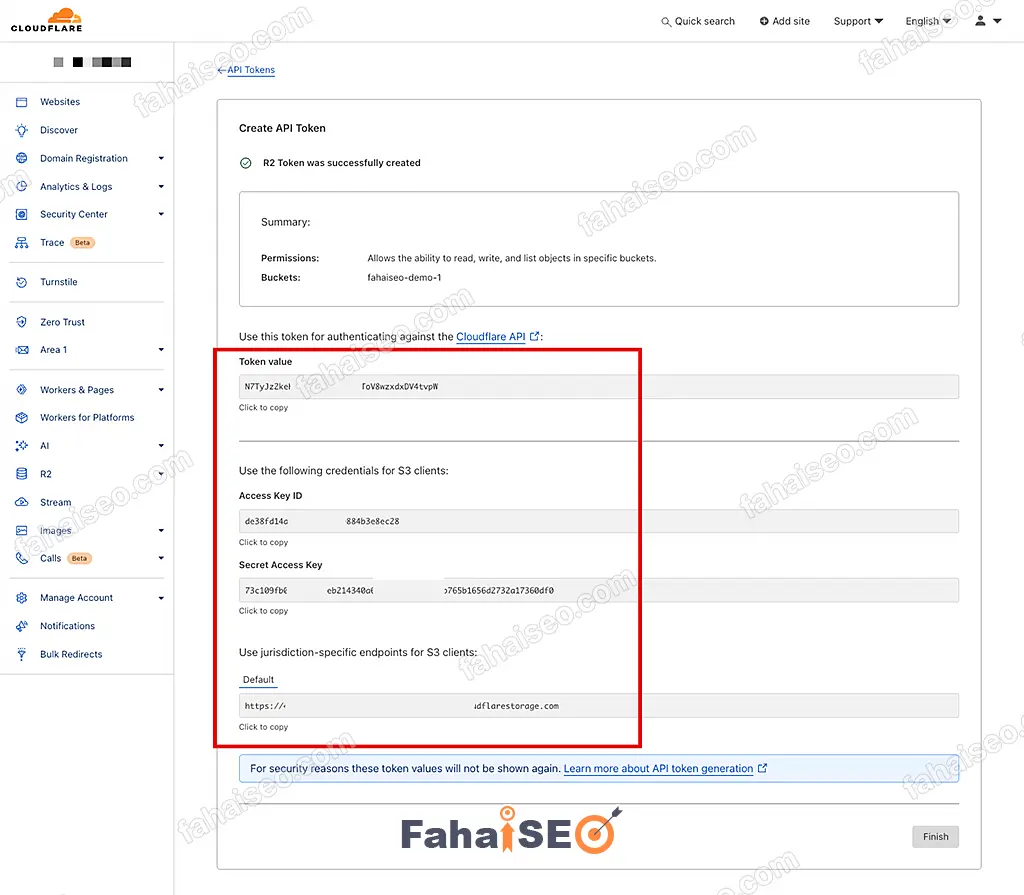
将页面中生成的API Token数据保存到本地备用。
Access Key,Secret Access Key,endpoints,这几个信息以后要用到。
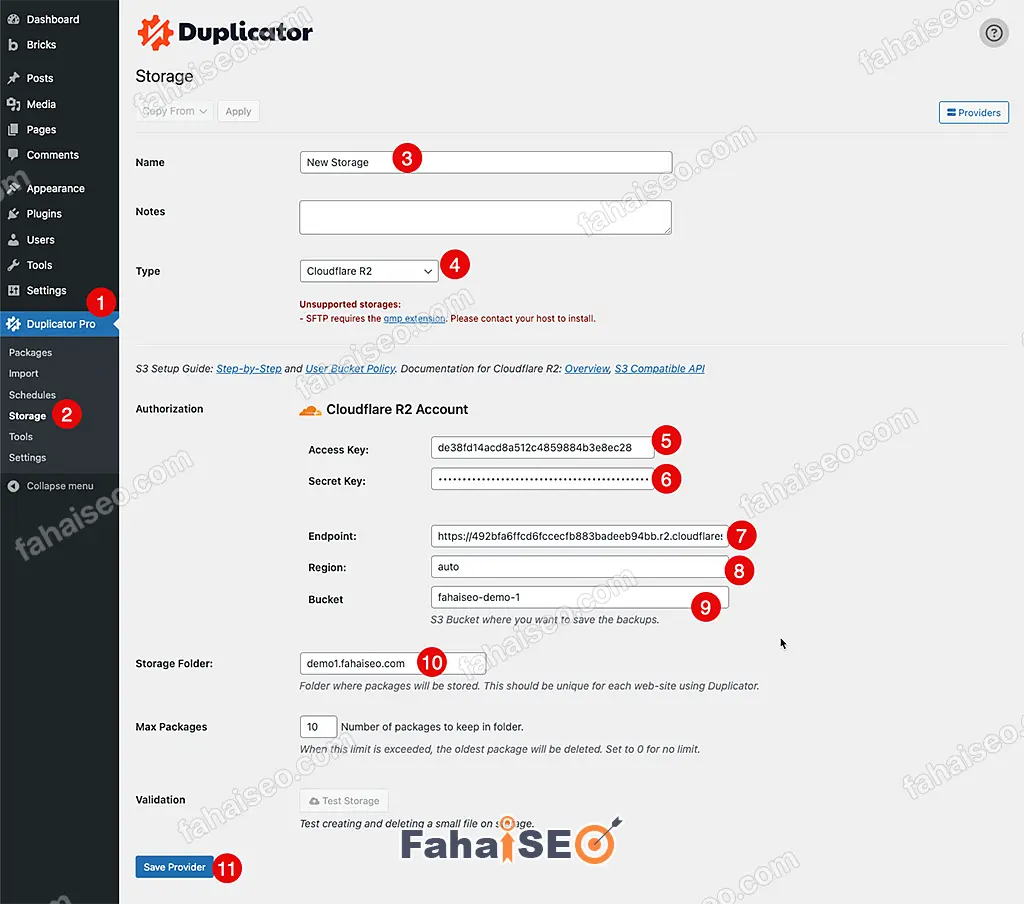
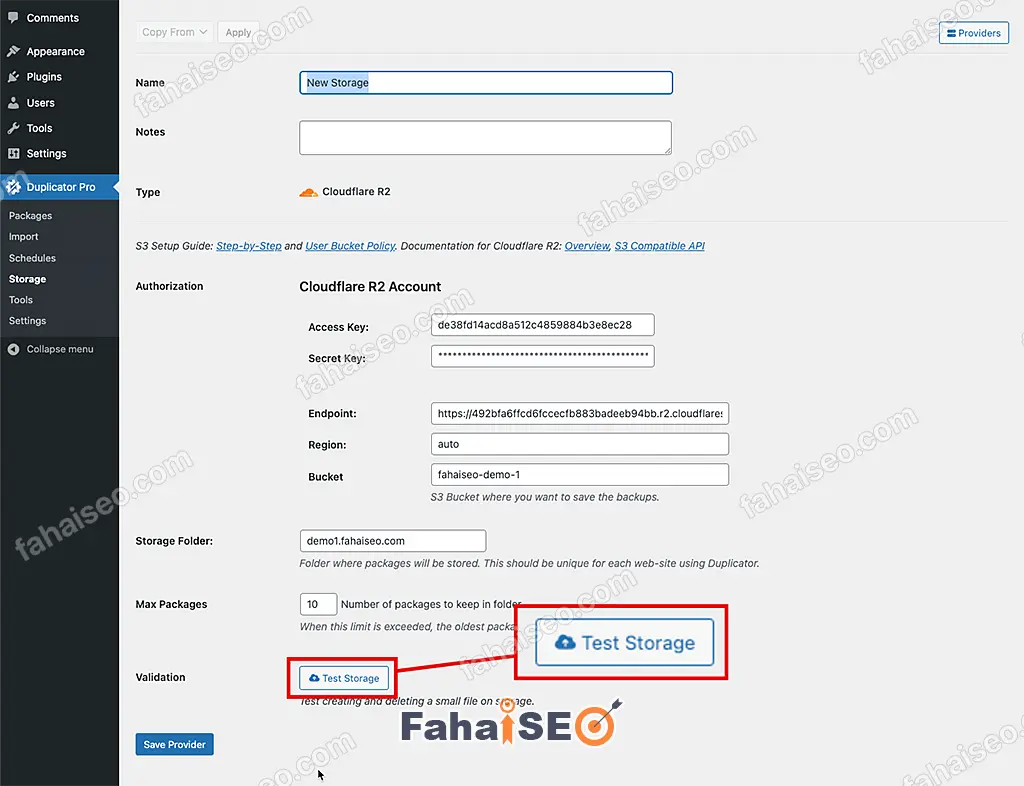
在WordPress后台,侧边栏找到Duplicator,Storage选项,Type选择Cloudflare R2,填入在Cloudflare R2中生成的 Token信息。
Region填写:auto,Bucket填写:Cloudflare中创建的容器名字。Storage Folder:就是容器中网站备份的文件夹名称,建议默认就好。Save Provider完成存储设定。
点击Test Storage,测试存储设置是否正确。
弹出提示 Successfully stored and deleted files,说明设置成功。
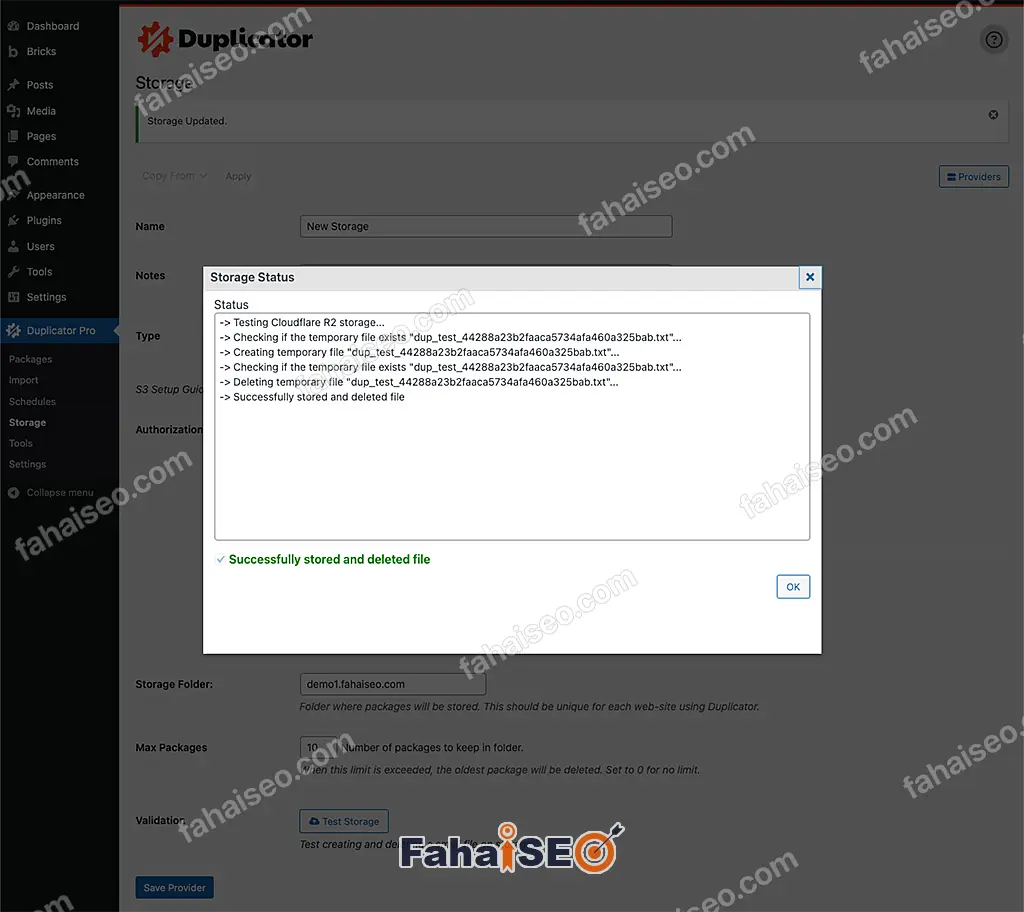
接下来设置WordPress定期将备份传到Cloudflare R2。
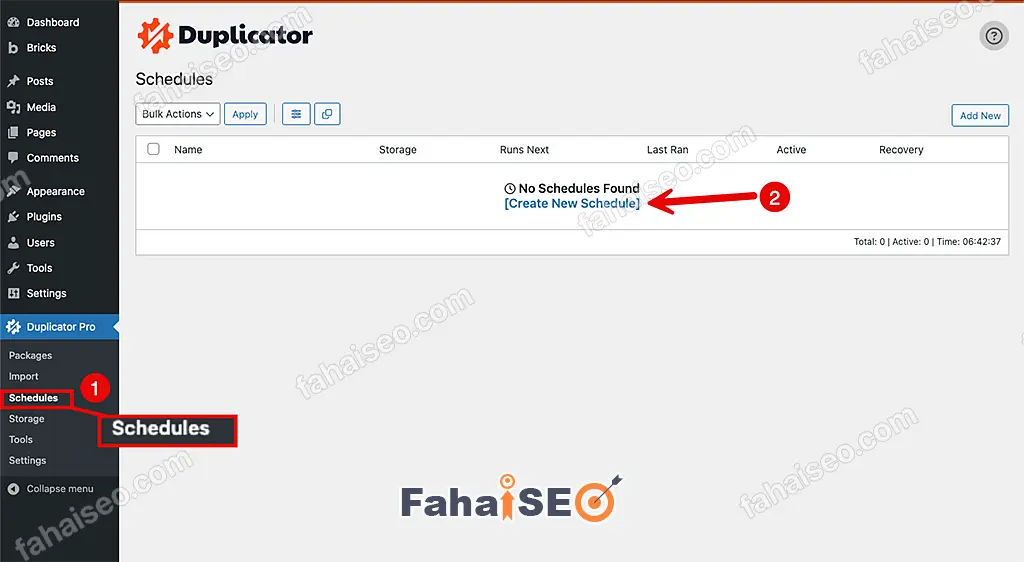
点击Create New Schedule进入下一步。
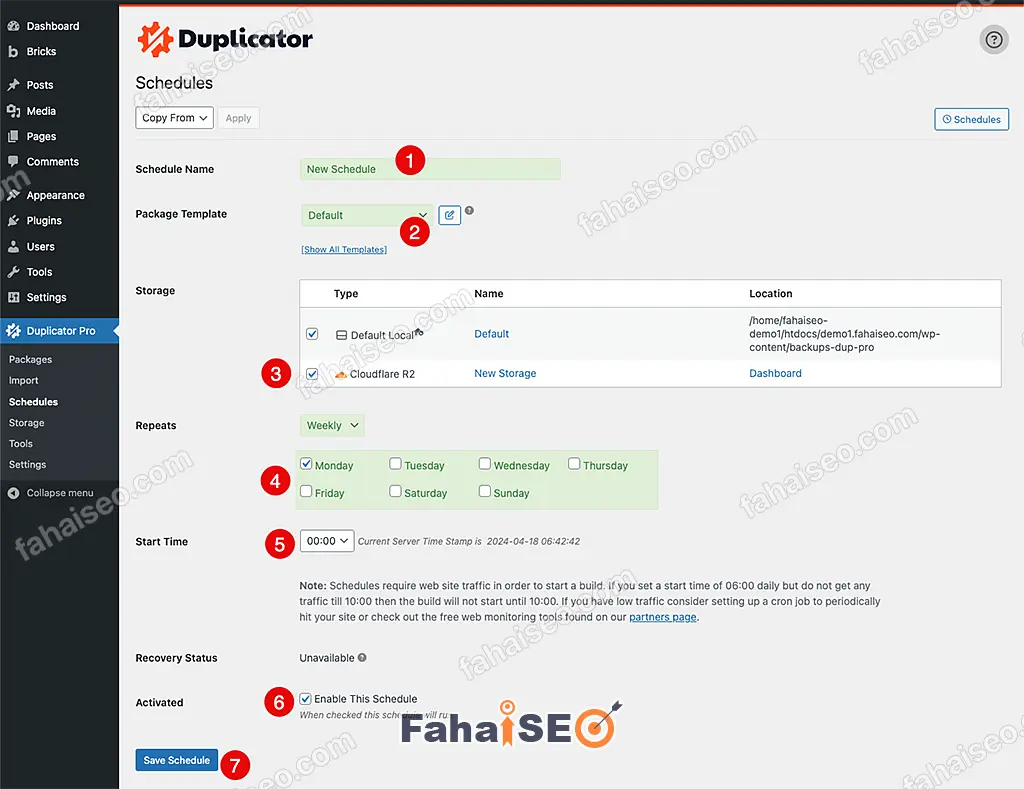
勾选Cloudflare R2,其他设置按照自己的需求设置。至此,所有的设置就完成了。Duplicator会在设定的时间自动将网站备份同步到Cloudflare R2。
通过面板实现方案
Cloudpanel
如果你不喜欢付费方案,那么可以考虑使用管理面板来免费实现同样的功能,只不过操作步骤要复杂很多。如果你很细心也很有耐心,那跟着我的教程一步步操作,肯定会成功的。
这里以Cloudpanel管理面板来演示。
登陆VPS,输入以下代码,开始配置。
rclone config接下来的步骤十分关键,错任何一步都将导致配置失败。务必仔细。
关键信息如下:
name = remote
provider = Cloudflare
access_key_id = your-access-key
secret_access_key = your-secret-access-key
endpoint = your-endpoint
acl = private
no_check_bucket = true
下面是配置过程全文。按照我的配置跟着做,你也肯定能成功。
No remotes found - make a new one
n) New remote
s) Set configuration password
q) Quit config
n/s/q> n
name> remote
Type of storage to configure.
Enter a string value. Press Enter for the default ("").
Choose a number from below, or type in your own value
 1 / 1Fichier
   \ "fichier"
 2 / Alias for an existing remote
   \ "alias"
 3 / Amazon Drive
   \ "amazon cloud drive"
 4 / Amazon S3 Compliant Storage Provider (AWS, Alibaba, Ceph, Digital Ocean, Dreamhost, IBM COS, Minio, Tencent COS, etc)
   \ "s3"
 5 / Backblaze B2
   \ "b2"
 6 / Box
   \ "box"
 7 / Cache a remote
   \ "cache"
 8 / Citrix Sharefile
   \ "sharefile"
 9 / Dropbox
   \ "dropbox"
10 / Encrypt/Decrypt a remote
   \ "crypt"
11 / FTP Connection
   \ "ftp"
12 / Google Cloud Storage (this is not Google Drive)
   \ "google cloud storage"
13 / Google Drive
   \ "drive"
14 / Google Photos
   \ "google photos"
15 / Hubic
   \ "hubic"
16 / In memory object storage system.
   \ "memory"
17 / Jottacloud
   \ "jottacloud"
18 / Koofr
   \ "koofr"
19 / Local Disk
   \ "local"
20 / Mail.ru Cloud
   \ "mailru"
21 / Microsoft Azure Blob Storage
   \ "azureblob"
22 / Microsoft OneDrive
   \ "onedrive"
23 / OpenDrive
   \ "opendrive"
24 / OpenStack Swift (Rackspace Cloud Files, Memset Memstore, OVH)
   \ "swift"
25 / Pcloud
   \ "pcloud"
26 / Put.io
   \ "putio"
27 / SSH/SFTP Connection
   \ "sftp"
28 / Sugarsync
   \ "sugarsync"
29 / Transparently chunk/split large files
   \ "chunker"
30 / Union merges the contents of several upstream fs
   \ "union"
31 / Webdav
   \ "webdav"
32 / Yandex Disk
   \ "yandex"
33 / http Connection
   \ "http"
34 / premiumize.me
   \ "premiumizeme"
35 / seafile
   \ "seafile"
Storage> 4
** See help for s3 backend at: https://rclone.org/s3/ **

Choose your S3 provider.
Enter a string value. Press Enter for the default ("").
Choose a number from below, or type in your own value
 1 / Amazon Web Services (AWS) S3
   \ "AWS"
 2 / Alibaba Cloud Object Storage System (OSS) formerly Aliyun
   \ "Alibaba"
 3 / Ceph Object Storage
   \ "Ceph"
 4 / Digital Ocean Spaces
   \ "DigitalOcean"
 5 / Dreamhost DreamObjects
   \ "Dreamhost"
 6 / IBM COS S3
   \ "IBMCOS"
 7 / Minio Object Storage
   \ "Minio"
 8 / Netease Object Storage (NOS)
   \ "Netease"
 9 / Scaleway Object Storage
   \ "Scaleway"
10 / StackPath Object Storage
   \ "StackPath"
11 / Tencent Cloud Object Storage (COS)
   \ "TencentCOS"
12 / Wasabi Object Storage
   \ "Wasabi"
13 / Any other S3 compatible provider
   \ "Other"
provider> Cloudflare
Get AWS credentials from runtime (environment variables or EC2/ECS meta data if no env vars).
Only applies if access_key_id and secret_access_key is blank.
Enter a boolean value (true or false). Press Enter for the default ("false").
Choose a number from below, or type in your own value
 1 / Enter AWS credentials in the next step
   \ "false"
 2 / Get AWS credentials from the environment (env vars or IAM)
   \ "true"
env_auth>
AWS Access Key ID.
Leave blank for anonymous access or runtime credentials.
Enter a string value. Press Enter for the default ("").
access_key_id> your-access-key
AWS Secret Access Key (password)
Leave blank for anonymous access or runtime credentials.
Enter a string value. Press Enter for the default ("").
secret_access_key> your-secret-access-key
Region to connect to.
Leave blank if you are using an S3 clone and you don't have a region.
Enter a string value. Press Enter for the default ("").
Choose a number from below, or type in your own value
 1 / Use this if unsure. Will use v4 signatures and an empty region.
   \ ""
 2 / Use this only if v4 signatures don't work, eg pre Jewel/v10 CEPH.
   \ "other-v2-signature"
region>
Endpoint for S3 API.
Required when using an S3 clone.
Enter a string value. Press Enter for the default ("").
Choose a number from below, or type in your own value
endpoint> your-endpoint
Location constraint - must be set to match the Region.
Leave blank if not sure. Used when creating buckets only.
Enter a string value. Press Enter for the default ("").
location_constraint>
Canned ACL used when creating buckets and storing or copying objects.

This ACL is used for creating objects and if bucket_acl isn't set, for creating buckets too.

For more info visit https://docs.aws.amazon.com/AmazonS3/latest/dev/acl-overview.html#canned-acl

Note that this ACL is applied when server side copying objects as S3
doesn't copy the ACL from the source but rather writes a fresh one.
Enter a string value. Press Enter for the default ("").
Choose a number from below, or type in your own value
 1 / Owner gets FULL_CONTROL. No one else has access rights (default).
   \ "private"
 2 / Owner gets FULL_CONTROL. The AllUsers group gets READ access.
   \ "public-read"
   / Owner gets FULL_CONTROL. The AllUsers group gets READ and WRITE access.
 3 | Granting this on a bucket is generally not recommended.
   \ "public-read-write"
 4 / Owner gets FULL_CONTROL. The AuthenticatedUsers group gets READ access.
   \ "authenticated-read"
   / Object owner gets FULL_CONTROL. Bucket owner gets READ access.
 5 | If you specify this canned ACL when creating a bucket, Amazon S3 ignores it.
   \ "bucket-owner-read"
   / Both the object owner and the bucket owner get FULL_CONTROL over the object.
 6 | If you specify this canned ACL when creating a bucket, Amazon S3 ignores it.
   \ "bucket-owner-full-control"
acl> private
Edit advanced config? (y/n)
y) Yes
n) No (default)
y/n> y
Canned ACL used when creating buckets.

For more info visit https://docs.aws.amazon.com/AmazonS3/latest/dev/acl-overview.html#canned-acl

Note that this ACL is applied when only when creating buckets.  If it
isn't set then "acl" is used instead.
Enter a string value. Press Enter for the default ("").
Choose a number from below, or type in your own value
 1 / Owner gets FULL_CONTROL. No one else has access rights (default).
   \ "private"
 2 / Owner gets FULL_CONTROL. The AllUsers group gets READ access.
   \ "public-read"
   / Owner gets FULL_CONTROL. The AllUsers group gets READ and WRITE access.
 3 | Granting this on a bucket is generally not recommended.
   \ "public-read-write"
 4 / Owner gets FULL_CONTROL. The AuthenticatedUsers group gets READ access.
   \ "authenticated-read"
bucket_acl>
Cutoff for switching to chunked upload

Any files larger than this will be uploaded in chunks of chunk_size.
The minimum is 0 and the maximum is 5GB.
Enter a size with suffix k,M,G,T. Press Enter for the default ("200M").
upload_cutoff>
Chunk size to use for uploading.

When uploading files larger than upload_cutoff or files with unknown
size (eg from "rclone rcat" or uploaded with "rclone mount" or google
photos or google docs) they will be uploaded as multipart uploads
using this chunk size.

Note that "--s3-upload-concurrency" chunks of this size are buffered
in memory per transfer.

If you are transferring large files over high speed links and you have
enough memory, then increasing this will speed up the transfers.

Rclone will automatically increase the chunk size when uploading a
large file of known size to stay below the 10,000 chunks limit.

Files of unknown size are uploaded with the configured
chunk_size. Since the default chunk size is 5MB and there can be at
most 10,000 chunks, this means that by default the maximum size of
file you can stream upload is 48GB.  If you wish to stream upload
larger files then you will need to increase chunk_size.
Enter a size with suffix k,M,G,T. Press Enter for the default ("5M").
chunk_size>
Maximum number of parts in a multipart upload.

This option defines the maximum number of multipart chunks to use
when doing a multipart upload.

This can be useful if a service does not support the AWS S3
specification of 10,000 chunks.

Rclone will automatically increase the chunk size when uploading a
large file of a known size to stay below this number of chunks limit.

Enter a signed integer. Press Enter for the default ("10000").
max_upload_parts>
Cutoff for switching to multipart copy

Any files larger than this that need to be server side copied will be
copied in chunks of this size.

The minimum is 0 and the maximum is 5GB.
Enter a size with suffix k,M,G,T. Press Enter for the default ("4.656G").
copy_cutoff>
Don't store MD5 checksum with object metadata

Normally rclone will calculate the MD5 checksum of the input before
uploading it so it can add it to metadata on the object. This is great
for data integrity checking but can cause long delays for large files
to start uploading.
Enter a boolean value (true or false). Press Enter for the default ("false").
disable_checksum>
Path to the shared credentials file

If env_auth = true then rclone can use a shared credentials file.

If this variable is empty rclone will look for the
"AWS_SHARED_CREDENTIALS_FILE" env variable. If the env value is empty
it will default to the current user's home directory.

    Linux/OSX: "$HOME/.aws/credentials"
    Windows:   "%USERPROFILE%\.aws\credentials"

Enter a string value. Press Enter for the default ("").
shared_credentials_file>
Profile to use in the shared credentials file

If env_auth = true then rclone can use a shared credentials file. This
variable controls which profile is used in that file.

If empty it will default to the environment variable "AWS_PROFILE" or
"default" if that environment variable is also not set.

Enter a string value. Press Enter for the default ("").
profile>
An AWS session token
Enter a string value. Press Enter for the default ("").
session_token>
Concurrency for multipart uploads.

This is the number of chunks of the same file that are uploaded
concurrently.

If you are uploading small numbers of large file over high speed link
and these uploads do not fully utilize your bandwidth, then increasing
this may help to speed up the transfers.
Enter a signed integer. Press Enter for the default ("4").
upload_concurrency>
If true use path style access if false use virtual hosted style.

If this is true (the default) then rclone will use path style access,
if false then rclone will use virtual path style. See [the AWS S3
docs](https://docs.aws.amazon.com/AmazonS3/latest/dev/UsingBucket.html#access-bucket-intro)
for more info.

Some providers (eg AWS, Aliyun OSS, Netease COS or Tencent COS) require this set to
false - rclone will do this automatically based on the provider
setting.
Enter a boolean value (true or false). Press Enter for the default ("true").
force_path_style>
If true use v2 authentication.

If this is false (the default) then rclone will use v4 authentication.
If it is set then rclone will use v2 authentication.

Use this only if v4 signatures don't work, eg pre Jewel/v10 CEPH.
Enter a boolean value (true or false). Press Enter for the default ("false").
v2_auth>
Size of listing chunk (response list for each ListObject S3 request).

This option is also known as "MaxKeys", "max-items", or "page-size" from the AWS S3 specification.
Most services truncate the response list to 1000 objects even if requested more than that.
In AWS S3 this is a global maximum and cannot be changed, see [AWS S3](https://docs.aws.amazon.com/cli/latest/reference/s3/ls.html).
In Ceph, this can be increased with the "rgw list buckets max chunk" option.

Enter a signed integer. Press Enter for the default ("1000").
list_chunk>
If set don't attempt to check the bucket exists or create it

This can be useful when trying to minimise the number of transactions
rclone does if you know the bucket exists already.

Enter a boolean value (true or false). Press Enter for the default ("false").
no_check_bucket> true
This sets the encoding for the backend.

See: the [encoding section in the overview](/overview/#encoding) for more info.
Enter a encoder.MultiEncoder value. Press Enter for the default ("Slash,InvalidUtf8,Dot").
encoding>
How often internal memory buffer pools will be flushed.
Uploads which requires additional buffers (f.e multipart) will use memory pool for allocations.
This option controls how often unused buffers will be removed from the pool.
Enter a duration s,m,h,d,w,M,y. Press Enter for the default ("1m0s").
memory_pool_flush_time>
Whether to use mmap buffers in internal memory pool.
Enter a boolean value (true or false). Press Enter for the default ("false").
memory_pool_use_mmap>
Remote config
--------------------
[remote]
provider = Cloudflare
access_key_id = your-access-key
secret_access_key = your-secret-access-key
endpoint = your-endpoint
acl = private
no_check_bucket = true
--------------------
y) Yes this is OK (default)
e) Edit this remote
d) Delete this remote
y/e/d> y
Current remotes:

Name                 Type
====                 ====
remote               s3

e) Edit existing remote
n) New remote
d) Delete remote
r) Rename remote
c) Copy remote
s) Set configuration password
q) Quit config
e/n/d/r/c/s/q> q
接下来回到Cloudpanel后台
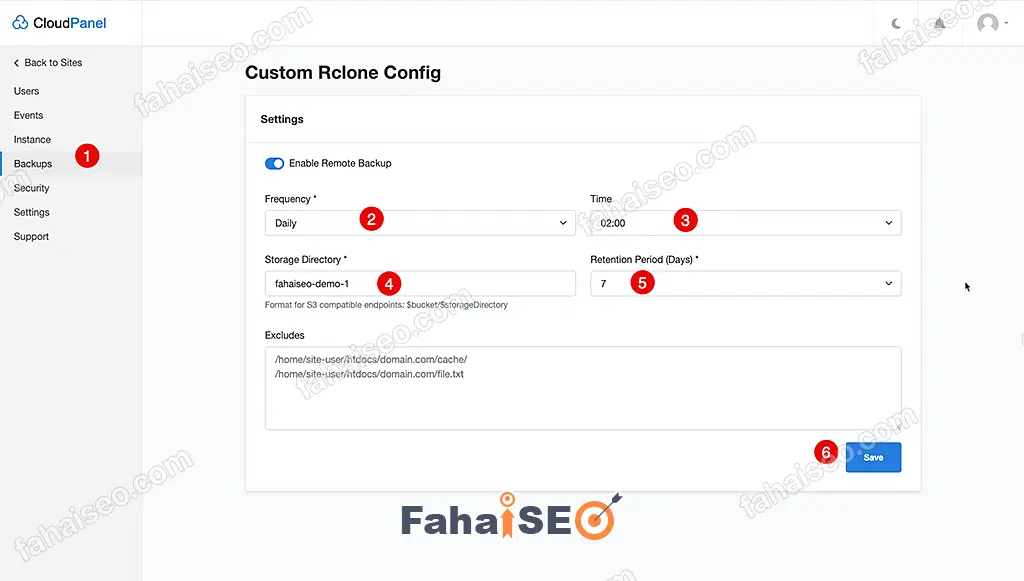
Storage Directory:填入Cloudflare R2中创建的容器名字,其他设置根据自己的喜好设置。点击Save保存设置。
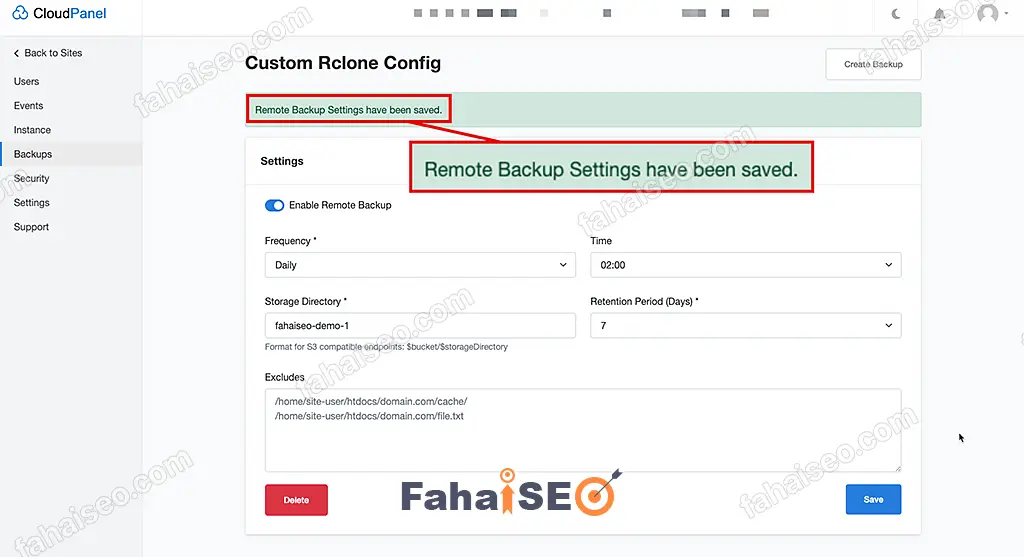
如果没有报错,提示Remote Backup Settings have been saved,就说明配置成功了。
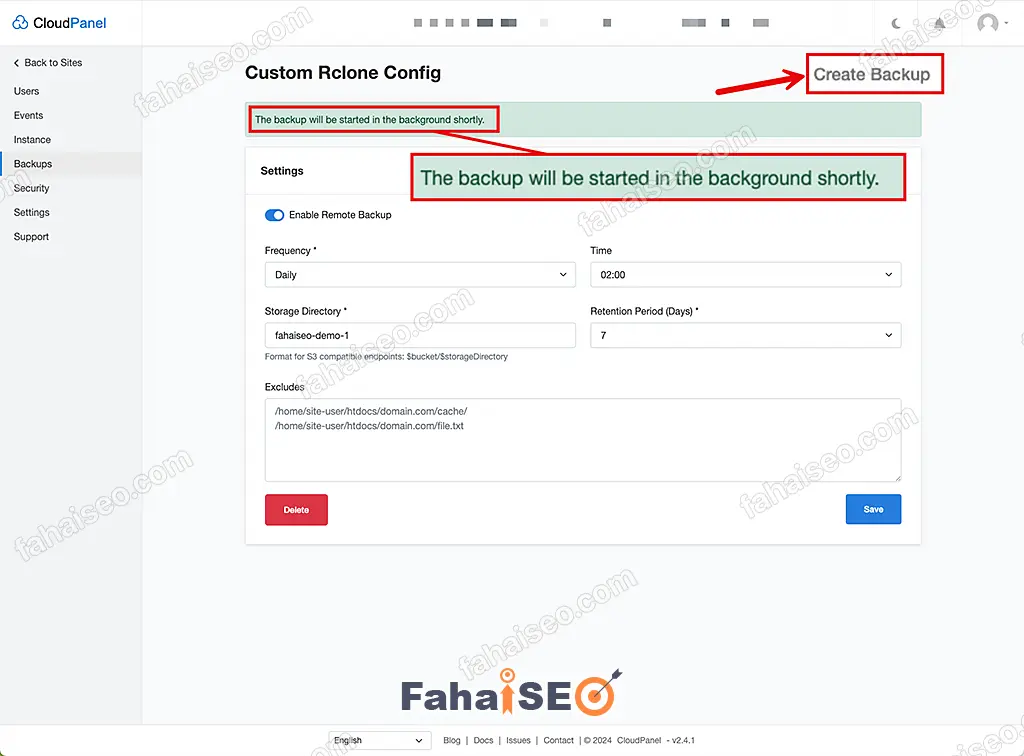
为了确保配置万无一失,可以点击右上角Create Backup 手动创建备份测试下。
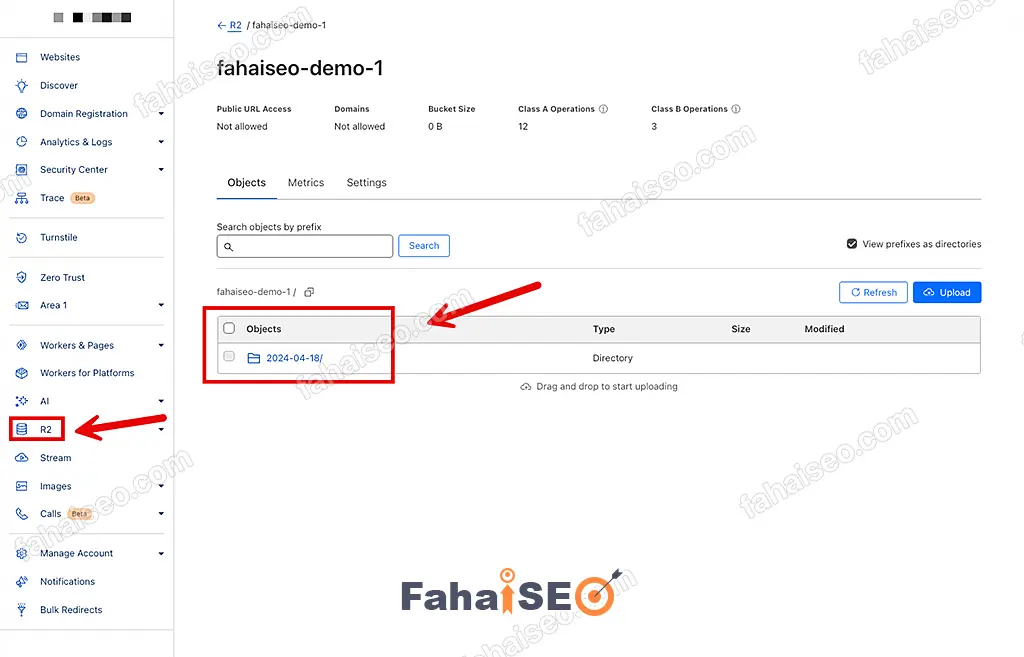
等待几分钟(如果服务器中网站很多,数据很大,时间会加长),到Cloudflare R2后台查看是否有新数据。
如果产生了数据,说明配置成功了。
注意事项
使用Cloudpanel面板的前提是你的网站架设在自己管理的VPS中。如果使用了托管共享主机比如Hostinger(Hosinger是内置的自家Hpanel面板),是无法按照上面的方法实现的。
常见问题答疑
有没有免费插件可以将WordPress网站备份到Cloudflare R2?
一些主流的备份插件(比如updraftplus、backuply)也提供了这个功能。但是都不约而同地需要购买高级付费版才能体验这个功能。免费插件暂时没发现。因为Cloudflare R2是个比较新的服务,免费插件方案现阶段大概率是不太可能的。
注册免费的Cloudflare账号就可以使用Cloudflare R2吗?
Cloudflare免费账号可以使用Cloudflare R2,但是需要绑定银行卡。超出免费套餐是会扣费的。不过一般使用大概率是不会超出免费套餐的。如果实在担心,可以考虑使用微软OneDrive,Google Drive这类云存储服务。
总结
本文介绍了将WordPress网站备份到Cloudflare R2的多种方案。如果追求简单高效,那么使用付费插件会是首选。如果预算有限,可以考虑本文推荐的免费方案,只是需要有足够的耐心,不单单是前期设置相对复杂需要足够耐心,后期维护遇到问题需要自己摸索处理也要有足够的耐心才行。

1条评论
frank
你好 博主 请问一下 通过Cloudpanel管理面板来备份,代码复制是一样的,只改了access_key_id = your-access-key
secret_access_key = your-secret-access-key
endpoint = your-endpoint
但是运行指令报错This value must be a single character, one of the following: n, s, q,是哪儿设置不对
法海
没有遇到你说的这种情况,不过正如我在博文中提到的,这个设置有点复杂,需要十分细心,建议你参考本文多试几次。